How to publish a Listing
Walkthrough video:
Introduction
In this help document we will teach you how to create a listing in the MLS. The process of publishing a listing is one of the first and most important to know once you become a member of the MLS. Using this Real Estate tech tool is a smart way to maximize your properties’ potential and open new doors for your business. In the following document you will learn how to effectively create a listing, step by step, from the creation to its publication.
Prerequisites
To publish a listing you will need the following:
- An active MLS account
- General information about the property (area, bedrooms, bathroom, location, photos, and any relevant legal documents)
Step 1 — Choose Listing Type
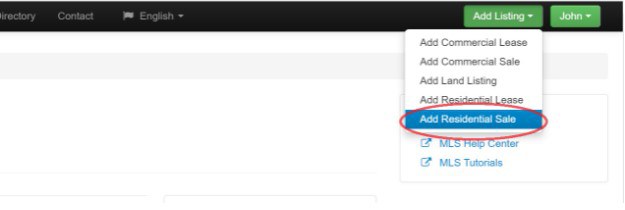
When you have logged in to the MLS, the first step to create a listing is to click on the “Add Listing” button, located at the upper right corner. A dropdown menu will appear with the following options: Commercial Lease, Commercial Sale, Land Listing, Residential Lease, Residential Sale. Choose the one that suits your preference and the nature of the property. Keep in mind that once you have created the listing with one of these templates, the listing type cannot be modified or changed into another one. For example, you cannot change a Residential Sale listing into a Commercial Sale listing.

Listing Types
- Commercial Lease: Select this when a commercial property will be leased or rented.
- Commercial Sale: Select this for a property that is for sale and has a commercial use (Office, hotels, bed and breakfasts, buildings, farms, etc.)
- Land Listing: Select this for home construction lots or large tracts of land without construction. The information you will provide is limited to describe land.
- Residential Lease: Select this for a residential property is going to be rented or leased as a home for personal use. This can include long-term rentals, short-term rentals, and vacation rentals.
- Residential Sale: Select this for the sale of any residential property such as homes, condos, townhomes, etc.
Step 2 — Create Listing
We will create a Residential Sale listing as an example. When you select the listing type it will automatically create a template. You will need to provide information for the 8 different categories which are grouped into tabs near the top of the screen.
Step 3 — Required Fields Inside a Listing
The fields marked with a red asterisk (*) are required in order to create the listing. If you do not fill out the required fields, an error message will be displayed. The system will let you know which tabs have errors and mark them in red. Once you click on a tab that contains errors, you will see the exact fields that are either empty or invalid.
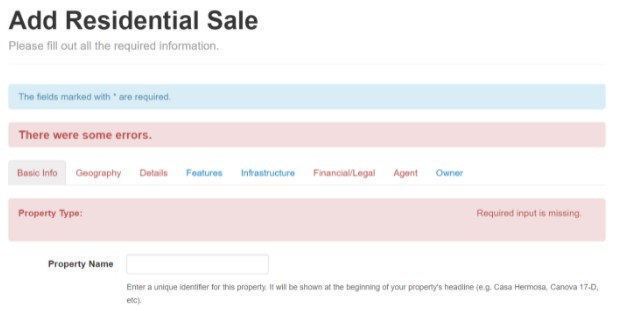
Important: You will not be able to save the listing until you fill out all required fields. Please make sure you provide the information for the required fields first, so that you can save the listing. This way - no matter what happens - you won’t lose your work. Later on you can fill in the non-essential information and continue improving your listing.
Step 4 — Save your listing
Once you have filled out all the required fields, you should click the blue “Add” button at the bottom of the page. This officially creates the listing. You will now be able to edit your listing and add more information anytime in the future.

Step 5 — View the Listing Overview
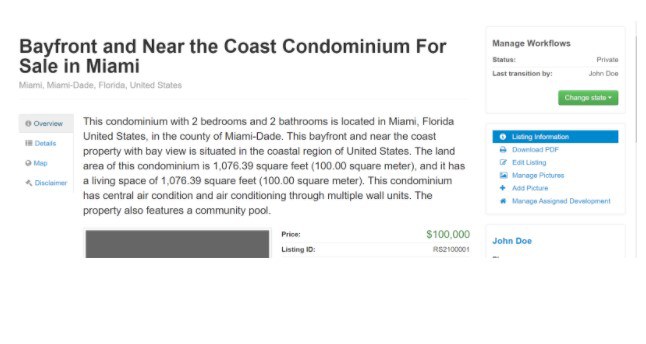
Once your listing has been created, you will be able to view all of the information. The system will automatically create a title and short description based on the information you provided in the required fields. These automatic titles and descriptions will be created for any of the languages for which you don’t add a custom text. However, we highly recommend that you write custom text for both the title and description whenever possible.
On the right hand side the "Manage Workflows" box shows the current status and allows you to change the status of your listing (See more in Step 8), and below that are various actions you can take on your listing, including editing, managing pictures, and creating promotional PDFs, among others.
Step 6 — View the Listing Details
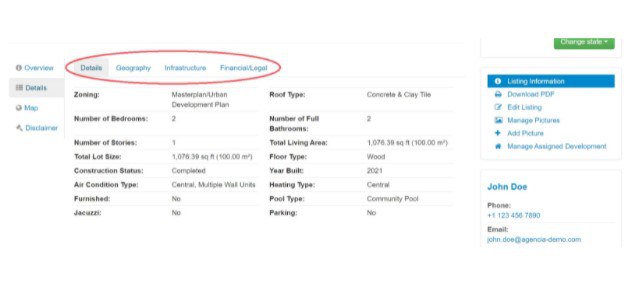
On the left side you can see the information tabs displayed according to its category, you will have different options to view the information and how it will be displayed. You can see the overview, look into the details, and view the map.
When looking at the details of the listing you just created, you will find the same categories of information divided into tabs that you can click through.
Step 7 — Edit your listing
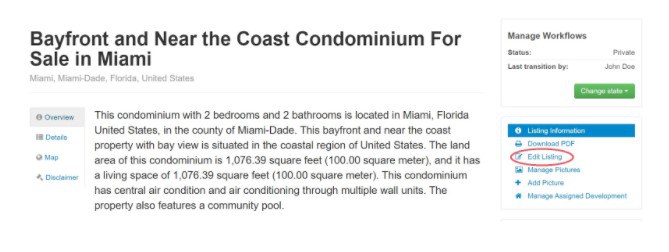
When your listing is saved you can edit it as many times as necessary, as long as the listing’s status is still “Private”.
Click the option that says “Edit Listing”. This will bring you to a familiar screen where you can edit the fields, customize the titles and descriptions, and add more information. Make sure that you hit the “Save” button in order to save all of your changes, or you can always hit the “Cancel” button to erase your changes.
Step 8 — Submit your listing for activation
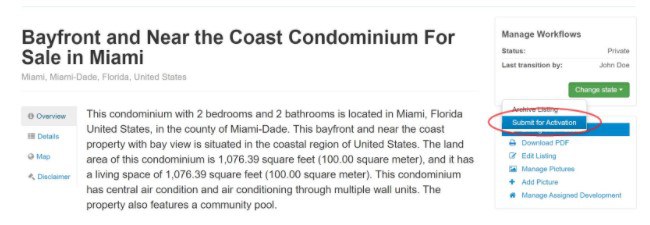
Until you change the state of the listing, it will remain “Private”. This means that only you will be able to see it. When you have finished filling out all the information and you are satisfied with the outcome, you can publish your listing.
First, you have to select the green “Change state” button located in the right column. In the drop down menu, select “Submit for Activation”:
A message box will appear in which you may add any comments to the MLS administrators before they verify the listing. Click “Submit” in order to continue with the process.
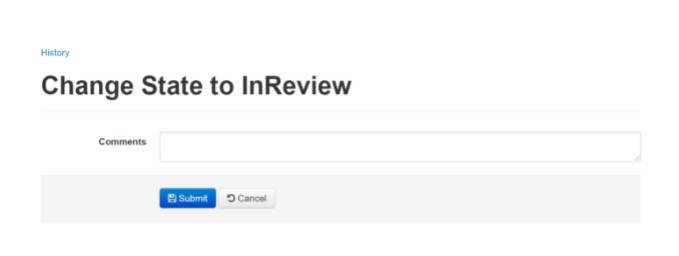
After this step, the listing status will change to “In review”. It will be automatically sent to our verification department where we will manually review your listing before publishing it. If the information is not accurate, the listing will be rejected. We will explain the reasons why and what needs to be fixed. After you have made the necessary corrections, you may submit your listing again for activation. After your listing is verified, it will be activated and made public. Once your listing is published, you won’t be able to edit certain characteristics that were verified. Please make sure that all information is correct when you submit it for activation.
We are always striving to improve the time it takes to activate your listings, but it can vary depending on the region and the administration team. Please contact support@propertyshelf.com if you have any questions regarding the listing verification process.
Step 9 — Published/Activated Listings
After your listing has been successfully verified and activated, it will immediately show up in our websites:
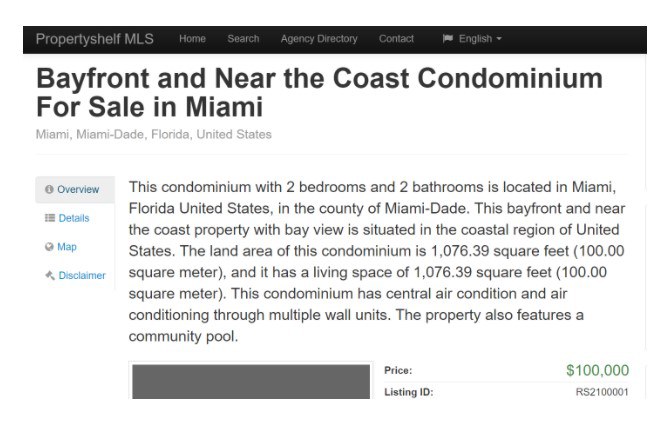
Your listing will also be published on our partner sites, however it may take up to 48-72 hours for the listing to show up on these sites.
Conclusion
In this article we learned the basic steps on how to create a listing successfully and publish it in our websites and referral sites. We have touched on the most general points regarding the topic of how to create a listing. However as an active member, you can do much more with your listings. In order to use your creativity and marketing skills, we highly recommend that you explore our different help articles and videos to achieve the best results.
Need more help?
